5D4N Singapore-Malaysia DIY on a Budget

With their skyscrapers, modern architecture, theme parks, mouthwatering cuisines and a lot more, there’s no wonder why Singapore and Malaysia attract thousands of foreign tourists (not to mention the “revenge travel” state). But travelling to these places need not to be expensive. Here’s our little DIY budget travel guide to help you prepare for your trip.

Travel Preparations: Things to Have Before the Trip

  1. Valid Passport (should not expire within 6 months)
  2. Roundtrip plane tickets
  3. SG Arrival Card (Must be submitted within 3 days prior to arrival in Singapore) [Only requirement as of June 2023, check with SG Immigration for any changes]
  4. eTravel QR Code (Must be accomplished within 3 days prior to departure)
  5. Travel itinerary
  6. Hotel booking confirmation
  7. Company ID/COE
  8. (Optional) Travel Insurance – we got ours from GCash Travel Protect International

Arrival in Singapore: SIM, Currency Exchange, etc.

Upon arrival in Singapore, as long as you have accomplished the SG Arrival Card, you can head on to their automated immigration lanes. You only need to scan your passport, pass biometrics and you’re good to go (unless if you encounter issues with their machines, then you will be directed to an Immigration Officer).

If you arrive early in Changi, you can head on to the Arrivals Hall and purchase an ezLink card and use it to pay for the bus, MRT or LRT, or you can also get a taxi to drop you off at your hotel in the city.

It’s preferrable to have SGD available or if you need to exchange money at the airport, it’s best to exchange only a few that you will need for transportation and have the rest exchanged once you’re in the city for better rates. You can also choose to rent a pocket WiFi to stay connected (access Google Maps, check MyTransport app for the best bus/MRT routes, etc.) or you can also purchase a 4G SIM Card that can give you 100GB.

Arrival in Kuala Lumpur: SIM, Currency Exchange, etc.

We expected our SIM to have worked, but unfortunately, we didn’t get any signal so we relied on the hotel’s WiFi for the entire duration of our stay in Kuala Lumpur. We also exchanged our money in Singapore so we didn’t have any need to exchange more. Getting around Malaysia is fairly easy as their transit system is fairly comprehensive and reliable. Best to find an accommodation near an MRT or bus station.

DIY 5D4N Singapore-Malaysia Itinerary

For our trip, we mainly walked from one location to the next (we accumulated a total of 71,892 steps). Singapore is walkable and fairly easy to navigate. Their buses and MRT are reliable and on-time. You can check the best routes via the MyTransport app that you can install for your trip to help you navigate Singapore.

Day 1: Arrival, Albert Hawker, Fort Canning Park, Little India, Haji Lane

  1. Arrival in Changi T4 at 12AM – booked a cab to hotel for 28SGD
  2. Checked-in to hotel (We booked our accommodation in South East Asia Hotel, located just walking distance to Bugis)
  3. Breakfast in Albert Hawker Center (cheaper prices as mostly locals eat here)
  4. Bugis+ Mall
  5. Fort Canning Park – 1km walk from Bugis
  6. Little India – 1.4km walk from Fort Canning Park
  7. Haji Lane – 1.1km walk from Little India

Day 2: Old Hill Police Station, Clarke Quay, Maxwell Hawker, Merlion Park, Esplanade

  1. Breakfast in Albert Hawker Center
  2. Old Hill Police Station – 1.5km walk from Bugis
  3. Clarke Quay – 220m walk from Old Hill Police Station
  4. Maxwell Hawker – 1.5km from Clarke Quay
  5. Merlion Park – 1.6km from Maxwell Hawker
  6. Esplanade – 450m from Merlion Park
  7. Suntec City – 900m from Esplanade

Day 3: Chinatown, Maxwell Hawker, Golden Mile Tower, Depart for KL

  1. Breakfast
  2. Check out from hotel (leave things)
  3. Explore and buy pasalubong from Chinatown – 0.99SGD bus to Chinatown
  4. Lunch at Maxwell Hawker to try out the famous Tian Tian Hainanese Chicken Rice
  5. Pick up things from hotel and head to Golden Mile Tower where we will depart for Malaysia
  6. 11:45PM Departure from Singapore to Malaysia

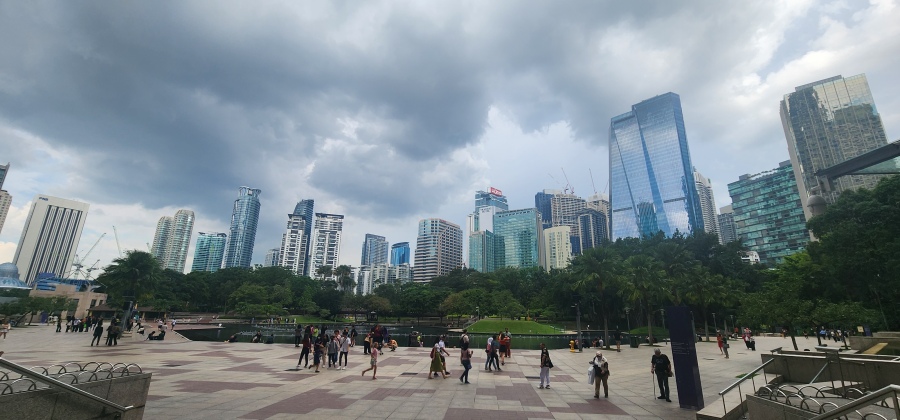
Day 4: Bukit Bintang, Lot 10, Fahrenheit 88, Suria KLCC, Petronas Twin Towers, KLCC Park, Bukit Bintang Walkway

  1. Check-in to hotel, breakfast
  2. Walking around Bukit Bintang, Lot 10, Fahrenheit 88
  3. Suria KLCC
  4. Petronas Twin Towers
  5. KLCC Park
  6. Bukit Bintang Walkway

Day 5: Depart for SG, Golden Mile Hawker, Jewel Changi

  1. Breakfast
  2. Check-out from hotel
  3. 10AM Departure from KL to Singapore
  4. Golden Mile Hawker Center
  5. Jewel Changi

Budget and Expenses

*Computed per person

Roundtrip Airfare (checked-in baggage for return flight) – Php8,627.72

Singapore hotel accommodation – Php6,064.23

Kuala Lumpur hotel accommodation – Php1,285.74

SG-KL-SG** bus fare – Php2,161.00

Travel Insurance (Php1,707/3) – Php569.00

4G SIM with 100GB – Php1,036.00

ezLink with 5SGD load- (SGD10) Php407.96

Pocket money (food, pasalubong, miscellaneous) – Php15,000

TOTAL: Php35,151.65

**We booked our transportation for Singapore-Kuala Lumpur-Singapore bus via 12Go online.

Travelling doesn’t mean you need to break the bank. You can customize your itinerary to fit within your budget and still experience a lot. Just make sure to plan ahead and do a lot of research.

NOTE: Travel requirements might change time to time, make sure to check with immigration.

Exploring Vietnam & Cambodia

I officially survived my first backpacking trip! The all too new experience was so much fun. But of course, no matter how much we prepared and researched, there will always be glitches and unexpected things that could happen. We just had to accept them as they come and charge it to experience. By the way, great thanks to the blogs & people who offered advice for our trip.

Vietnam and Cambodia offers different things, but there is surely one for each traveler. Vietnam in its fast-paced metro life, and Cambodia in its laid back provincial-like atmosphere. Evidently, there are more things to explore when I get back to these countries. And as a first time backpacker, I am proud of myself for having accomplished such feat. As much as I would like to share my whole experience, I am going to share some things that I deem essential for a backpacking trip.

Do your research. When going to a place the first time, it is very important to do a research, like the climate, acceptable behavior and clothes. Get to know your destination, and know simple words or simple phrases such as “Thank you”.

Plan your itinerary. Trips would be much fun if you have an itinerary prepared. However, allow yourself some changes in the plans. You’ll never know what unexpected things might happen. Welcome the change, you’ll never know where it can take you.

Get a map. Maps are truly important in exploring a new place. It’s not necessary that you get the big-ass map, just one that would suffice your needs. This would be helpful especially if you want to do your own walking-tour (like what we did), or simply for you to not get lost (we don’t want that to happen).

Hanoi Backpackers' Hostel

Hanoi Backpackers’ Hostel

Go for hostels. Ditch the luxurious stay in hotels, instead, go for backpacker hostels. This is a sure-fire way for you to get to know fellow travelers, and maybe have some friends to accompany you on your trip.

Tuktuk driver in Cambodia

Tuktuk driver in Cambodia

Ride public transport. Reserve the taxi ride on far-flung places. Whenever possible, take the public transport. When in Vietnam, ride the motorcycle, but learn to haggle for the price. Don’t get on the motorcycle unless you and the local have agreed on a price. Same thing in Cambodia, agree on a price first before you get on the tuktuk.

Know the Vietnamese terms for the places you want to go to. This is specific for those planning to explore Vietnam. We had trouble in locating some museums as locals don’t understand the English language that much. The perfect way to do is to have Vietnamese names of the museums on hand, and show it to the locals. Also, be very careful in the symbols that you used, one wrong symbol and its a completely different thing.

These are just some of the things I learned from other travelers and from my experience. Just remember that no matter how much you prepared for a trip, be prepared and accept the changes that come along the way. Leave some room for adjustments. As what they always say, “Expect the unexpected.”

Day 13: Entering the Cu Chi Tunnels

Alas, the last full day of our backpacking trip has come. We definitely saved the best for last. We booked a half-day tour of the Cu Chi Tunnels through our hostel. As usual, bus picks us up at our hostel, brings us to the destination, takes us back to Saigon.

One tourist trying to squeeze in one of the hiding places

One tourist trying to squeeze in one of the hiding places

The Cu Chi tunnels is located northwest of Saigon City. It played an important role in the history of Vietnam in their struggle against foreign forces. The tunnels is a large network the underlie much of the country. They are basically locations of several military campaigns. They were used as hiding spots during combat, communication and supply routes, hospitals, food and weapon caches and living quarters. It was immensely important to the Viet Cong.

Tour in the Cu Chi Tunnels was very exciting and intimidating. There were displays of the booby traps and “surprises” for the American soldiers. These tactics were of great help in their resistance from the U.S.

Light after the dark tunnel

Light after the dark tunnel

We were also given the chance to crawl into one of the tunnels for a good 20 meters (there are longer tunnels for the brave of heart). It was a bit terrifying because I kept reading that there were bats inside. I didn’t want to encounter a bat and panic in such a confined space and in such total darkness. My knees hurt and my legs were shaking when we reached the end of the tunnel.

This experience was absolutely amazing and was truly the perfect way to end our trip. After we were back in Saigon, we stopped by Trung Nguyen for a late lunch and a cup of the delicious Vietnamese coffee.

Later that night, we went back home, filled with new experiences and stories to tell of our first backpacking trip.

Day 12: Curious Incident at Ben Thanh Market

We arrived Ho Chi Minh (Saigon) just before lunch time, from riding the sleeper bus all night. After checking into our hostel, and refreshing ourselves, we immediately went to Ben Thanh Market to buy more souvenirs.

As we already explored the market a few days ago, we were pretty familiar on what to expect and on what to do. I only bought a few items and looked around aimlessly. Then the incident happened. I was simply looking around at some beautiful bangles and earrings which caught my attention, as they looked the same as what was being sold in the Philippines. I was really interested on knowing if prices were the same or not, so I asked the vendor on how much were the items. Turned out, the items were quite expensive, so I declined. As I continued perusing over the merchandise, she continued asking me “How much?” in her high-pitched voice. It was starting to get a bit irritating as she kept asking the same thing, over and over. As we were walking away, she then shouted “You crazy! Ask price and no buy.” I immediately did a double take on her. I mean, what the hell did we do?! With that, we stormed off. I really didn’t want to prolong this confrontation.

Pissed off as I was, I decided to brush off this incident. No use thinking over and fighting back. I didn’t want this experience to mar my experience in Vietnam.

After Ben Thanh, we explored other places to check on what to buy. When we were satisfied, we called it a day and went back to our hostel.

Day 13: Entering the Cu Chi Tunnels